
Author: Ashton Myung Kim, CEO, Fresnel Factory Inc.
Reading Time: 7 minutes
Quick Answer
If a product was originally designed around the STMicroelectronics STHS34PF80 and the TMOS10-12030 Fresnel lens, the replacement strategy depends on whether the product must keep stationary presence detection or only needs motion detection.
- For motion detection with minimal mechanical change: Murata IRS-D200ST00R1 is a practical candidate because it is a low-profile SMD digital PIR sensor.
- For comparison: Excelitas PYD 2592 / 7765 can also be evaluated as an SMD PIR option, but Fresnel Factory’s simulation showed less distinct projected-image separation than Murata in this lens condition.
- For stationary presence detection: Excelitas TPiS 1S 1385 / 5029 CaliPile is a strong candidate, and Fresnel Factory confirmed through simulation that CaliPile can be a good option when presence detection is required.
- For minimum enclosure impact: the first design goal should be to keep the TMOS10-12030 outer lens shape, mounting footprint, and sensor-to-lens distance as close as possible to the original design.
- Before changing sensors: engineers should verify optical signal distribution, threshold setting, PCB height, firmware behavior, and real detection performance with the final enclosure.
Why does STHS34PF80 replacement planning matter for TMOS-based products?
The STMicroelectronics STHS34PF80 is an infrared motion and presence detection sensor based on TMOS technology. ST describes the device as an uncooled, factory-calibrated infrared sensor operating in the 5 µm to 20 µm wavelength range. It is designed to detect motion, presence, or an overtemperature condition by measuring IR radiation from objects within its field of view.
In many real projects, the sensor is not the only fixed part of the design. The optical lens, mechanical opening, adhesive structure, PCB location, and enclosure tooling may already be completed before production. This was the situation in a project with a global building-control company, where the TMOS10-12030 lens and mechanical structure had already been designed around the original sensor.
In that case, the engineering question is not simply “which sensor has the best specification?” The more practical question is:
Which sensor can be evaluated while keeping the existing TMOS10-12030 lens and minimizing changes to the mechanical enclosure?
Can the TMOS10-12030 lens be reused with another sensor?
Yes, but only after optical simulation and signal validation. The TMOS10-12030 lens was originally designed for the STHS34PF80 sensor geometry. When another sensor is placed behind the same Fresnel lens, the projected IR image, signal distribution, and sensing-element geometry change.
Fresnel Factory evaluated replacement candidates by keeping the original lens condition as much as possible. The key design constraint was to maintain the existing sensor-to-lens distance of approximately 3.23 mm and avoid changes to the lens mounting footprint. This approach is useful when enclosure tooling is already close to release or when the customer wants to avoid a full mechanical redesign.
However, “lens reuse” does not mean the replacement sensor will behave exactly like STHS34PF80. PIR sensors, thermopile sensors, and TMOS sensors have different sensing principles and different signal-processing behavior.
The lens may be physically reusable, but the firmware threshold, signal interpretation, and final detection map must be revalidated.
What are the main sensor candidates for replacing STHS34PF80?
The following candidates are practical starting points for engineering evaluation when a product originally used STHS34PF80 with the TMOS10-12030 lens.
| Sensor model | Manufacturer | Sensor type | Best use case | Presence detection | Lens reuse potential |
|---|---|---|---|---|---|
| STHS34PF80 / STHS34PF80TR | STMicroelectronics | TMOS infrared sensor | Original motion and presence detection design | Yes | Original design condition |
| Murata IRS-D200ST00R1 | Murata | SMD digital PIR sensor | Short-term motion-detection replacement with low-profile package | No, motion detection only | High, based on Fresnel Factory simulation |
| Excelitas PYD 2592 / 7765 | Excelitas | Low-power dual-element SMD DigiPyro PIR sensor | Alternative SMD PIR comparison candidate | No, motion detection only | Possible, but simulation showed less distinct projected-image separation than Murata |
| Excelitas TPiS 1S 1385 / 5029 CaliPile | Excelitas | Thermopile-based CaliPile sensor | Presence, motion, and temperature-related sensing | Yes | Good candidate when stationary presence detection is required; simulation validation recommended |
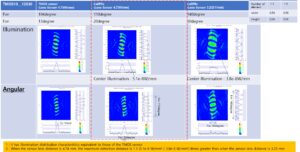
for STHS34PF80, Murata IRS-D200ST00R1, Excelitas PYD 2592 / 7765, and Excelitas TPiS 1S 1385 / 5029 CaliPile
using the TMOS10-12030 lens condition.
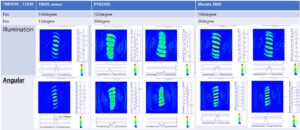
for STHS34PF80, Murata IRS-D200ST00R1, Excelitas PYD 2592 / 7765, and Excelitas TPiS 1S 1385 / 5029 CaliPile
using the TMOS10-12030 lens condition.
Why is Murata IRS-D200ST00R1 a practical motion-detection candidate?
Murata IRS-D200ST00R1 is a small, low-profile, reflowable SMD digital PIR sensor. Murata lists the IRS-D series as a 6 mm × 6 mm × 2.6 mm SMD digital PIR sensor with I²C output. This makes it attractive when the design must avoid a tall through-hole PIR package and preserve the existing mechanical stack-up.
In Fresnel Factory’s simulation using the TMOS10-12030 lens condition, Murata’s SMD PIR sensor produced a clearer projected image and more usable signal separation than the Excelitas PYD 2592 / 7765 comparison case. This does not mean it is a drop-in equivalent to STHS34PF80. It means it is a practical candidate when the product can accept motion detection only.
The key limitation is important: a PIR sensor detects changes in IR energy caused by movement. It does not provide the same stationary presence behavior as the original TMOS-based design.
How does Excelitas PYD 2592 / 7765 compare with Murata IRS-D200ST00R1?
Excelitas PYD 2592 / 7765 is a low-power dual-element SMD DigiPyro PIR sensor. It is a useful comparison candidate because it is also an SMD PIR device and can be considered when the design team wants a digital PIR alternative.
In Fresnel Factory’s lens simulation, however, the projected image from PYD 2592 / 7765 appeared more merged and less distinct than the Murata case under the same TMOS10-12030 lens condition. This matters because the Fresnel lens forms zones of IR energy on the sensing element. If the projected zones become less distinct, the firmware may need more careful threshold tuning and the final detection pattern may differ from the original design.
PYD 2592 / 7765 should therefore be treated as an evaluation candidate, not as the first-choice recommendation when minimum optical change is the main priority.
What if stationary presence detection is required?
If the product must detect stationary presence, a PIR-only replacement is usually not sufficient. This is where Excelitas TPiS 1S 1385 / 5029 CaliPile becomes important.
CaliPile is a thermopile-based intelligent IR sensor family. Excelitas describes the TPiS 1S 1385 CaliPile sensor as capable of motion detection, presence monitoring, and temperature measurement from a compact sensor package. This makes it a stronger candidate when the original design used STHS34PF80 not only for motion, but also for stationary presence detection.
Fresnel Factory’s simulation confirmed that CaliPile can be a good choice when stationary presence detection is required. The final decision should still be made after validating the optical distribution, real detection distance, ambient-temperature behavior, firmware threshold, and product-level detection map with the
final enclosure.
Can the same mechanical enclosure be kept?
In many replacement projects, the most expensive change is not the sensor itself. It is the enclosure tooling, lens opening, mounting structure, adhesive design, and production validation.
For this reason, Fresnel Factory’s recommended approach is:
- Keep the TMOS10-12030 outer lens shape if the enclosure opening is already fixed.
- Keep the sensor-to-lens distance close to the original value whenever possible.
- Change the PCB and sensor footprint first before changing the enclosure.
- Use simulation to compare projected IR distribution across candidate sensors.
- Validate the final design with motion and presence test scenarios, not only with component datasheets.
If a new optical pattern is required, Fresnel Factory can usually redesign the internal Fresnel pattern while keeping the outer lens footprint. This allows the customer to reduce enclosure impact while still adapting the lens to a different sensor geometry.
Which sensor should engineers choose?
| Engineering priority | Recommended candidate | Reason |
|---|---|---|
| Keep the existing TMOS10-12030 lens and minimize mechanical changes | Murata IRS-D200ST00R1 | Low-profile SMD PIR package; simulation showed clear projected-image behavior under the existing lens condition |
| Evaluate another SMD PIR option | Excelitas PYD 2592 / 7765 | Digital SMD PIR candidate, but projected-image separation should be checked carefully |
| Maintain stationary presence detection | Excelitas TPiS 1S 1385 / 5029 CaliPile | Thermopile-based sensor capable of presence monitoring; confirmed as a good candidate by Fresnel Factory simulation |
| Preserve original behavior as closely as possible | STHS34PF80 / STHS34PF80TR | Original TMOS sensor condition; verify supply continuity and procurement strategy separately |
What should be validated before changing the sensor?
Before releasing a replacement sensor design, engineers should validate the following items:
- Optical projection: Does the Fresnel lens focus IR energy onto the active sensing area?
- Sensor-to-lens distance: Is the original distance, approximately 3.23 mm in this project condition, still usable?
- Signal strength by angle: Does the signal remain strong enough at the target field of view?
- Presence behavior: Is stationary human presence required, or is motion detection sufficient?
- Firmware threshold: Does the new sensor require different filtering or threshold logic?
- Mechanical height: Does the package height affect PCB location, enclosure clearance, or lens distance?
- Environmental behavior: Does the sensor remain stable under expected temperature and sunlight conditions?
- Product-level detection map: Does the final device meet the required 5 m, 10 m, or other target detection distance?
How can Fresnel Factory support sensor replacement projects?
Fresnel Factory supports IR sensor projects from optical simulation to lens manufacturing and performance testing.
For projects using STHS34PF80, Murata IRS-D200ST00R1, Excelitas PYD 2592 / 7765, or Excelitas TPiS 1S 1385 / 5029 CaliPile, the recommended workflow is:
- Review the existing sensor, PCB, lens, and enclosure constraints.
- Simulate candidate sensors with the existing lens geometry.
- Compare projected IR image, signal strength, and blind-zone risk.
- Decide whether the current TMOS10-12030 lens can be reused.
- If needed, redesign only the internal Fresnel pattern while keeping the same outer footprint.
- Validate the final product with real detection tests using the customer’s target motion and presence scenarios.
FAQ
Can Murata IRS-D200ST00R1 replace STHS34PF80 directly?
Not directly. Murata IRS-D200ST00R1 is a PIR motion sensor, while STHS34PF80 is a TMOS-based infrared motion and presence sensor. Murata can be a practical candidate when motion detection is acceptable and mechanical change must be minimized.
Can the TMOS10-12030 lens be reused with Murata IRS-D200ST00R1?
Fresnel Factory’s simulation showed that Murata IRS-D200ST00R1 can be evaluated with the existing TMOS10-12030 lens condition. The final design should still be verified with real product-level detection testing.
Does Murata IRS-D200ST00R1 support stationary presence detection?
No. Murata IRS-D200ST00R1 is a PIR motion sensor. It is suitable for detecting changes caused by movement, but it should not be treated as an equivalent replacement for stationary presence detection.
Is Excelitas PYD 2592 / 7765 a possible replacement?
Yes, it is a possible SMD PIR evaluation candidate. However, Fresnel Factory’s simulation showed less distinct projected-image separation than the Murata case under the same lens condition.
Which sensor is better if stationary presence detection is required?
Excelitas TPiS 1S 1385 / 5029 CaliPile is a strong candidate when stationary presence detection is required.
Fresnel Factory confirmed through simulation that CaliPile can be a good option for this requirement.
Will changing the sensor require changing the lens?
Not always. If the outer lens footprint and sensor-to-lens distance can be maintained, the same lens may be reused or the internal Fresnel pattern may be redesigned while keeping the same outer shape.
What is the most important validation step?
The most important step is product-level validation. Component datasheets are not enough because the final detection performance depends on the lens, enclosure, sensor position, firmware threshold, and real use case.
Next step: optical simulation and lens validation
If your product uses STMicroelectronics STHS34PF80 or was designed around the TMOS10-12030 lens, the safest next step is to evaluate replacement sensors through optical simulation before changing the enclosure.
Fresnel Factory can help compare Murata IRS-D200ST00R1, Excelitas PYD 2592 / 7765, and Excelitas TPiS 1S 1385 / 5029 CaliPile under your existing lens and mechanical constraints.